This witchy Halloween charm bracelet is the perfect accessory for any Halloween lover! Wear it all October long to add a festive touch to any outfit!
I am so excited about the witchy Halloween charm bracelet tutorial that I am going to share with you today! Last week I pulled out my jewelry supplies to do some repairs and I found these fabulous Halloween charms. I obviously bought them in years past, and I believe recognize the brand as being from JoAnn Fabrics. (If not there then you can check Hobby Lobby.)

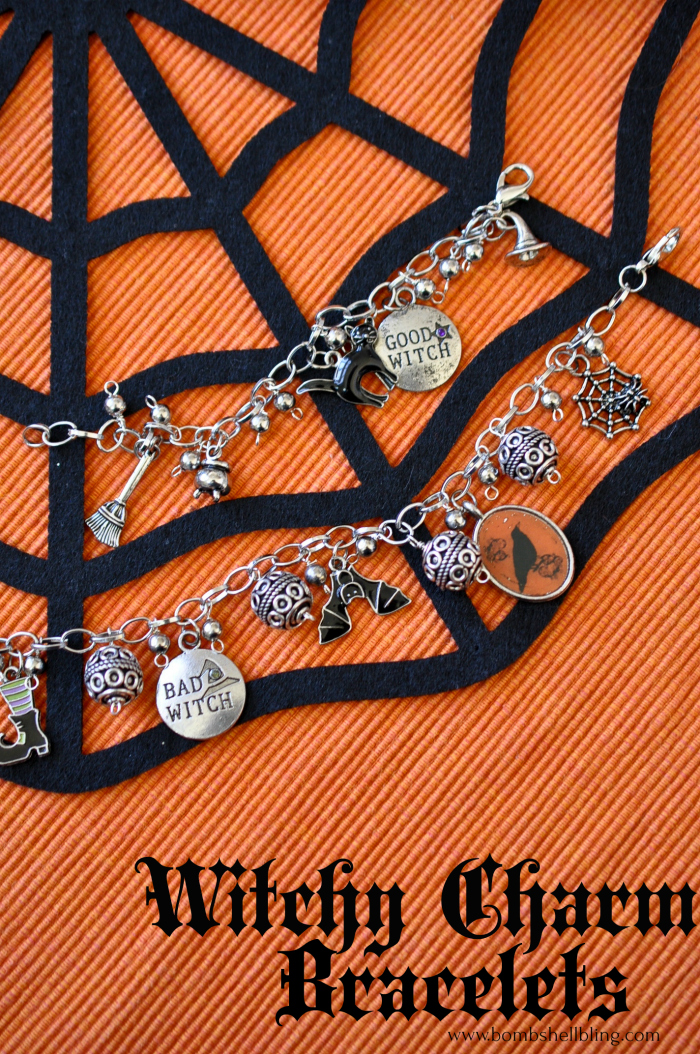
My little girl is dying to be a witch this year for Halloween, so I decided on the spot to throw out my afternoon plans and make us both a “witchy” Halloween charm bracelet. It seemed especially appropriate since there was a “Good Witch” charm – the sweet, blonde little 5 year old – and a “Bad Witch” charm – the feisty, dark haired mama. We have both been wearing them ever since I finished. So fun!

Now let’s talk about how to make them. You just need some basic tools and a couple of basic skills and you are good to go! They came together quickly and were a lot of fun to make and even more fun to wear!

For this Halloween charm bracelet tutorial you will need:
- jewelry chain (I believe this is from Hobby Lobby, but you can find chain at any craft shop.)
- Halloween charms (I believe I got this at JoAnn Fabrics in years past.)
- jump rings
- a clasp for each bracelet
- some additional beads to enhance the bracelets (I went very basic and small with hers and added a few more elaborate beads for mine.)
- eyepins
- round nose pliers
- wire snips
- flat nosed pliers

First, measure the wrist and cut the chain accordingly. Her little bracelet was about 5 1/2 inches of chain, and mine was about 7 3/4 inches of chain.


Use the flat nosed pliers to gently open a jump ring, thread it through the clasp, and attach the clasp to one end of the chain.

It is time to lay out a plan for your witchy Halloween charm bracelet, after which you can get started. I basically looked at how many charms and I had, counted out the chain links, and spaced them evenly. The small bracelet only had three links open between each charm, but the larger bracelet had five.
Use the same technique that you used with the clasp to attach the charms. Use the flat nosed pliers to gently open a jump ring, thread it through the charm, and thread it through a chain link prior to closing the jump ring with the pliers.


On either side of the charm I added small, plain beads. Prepare your beads by putting them each onto an eyepin. Use your round nosed pliers to gently bend the eyepin to the side near the base of the bead. Now wrap the eyepin wire back around the round-nosed pliers until it has created a full loop. Leave it open—do not twist it shut yet!
Thread the eyepin through the chain link. Now I usually use my round-nosed pliers to gently grip the loop in place, as shown above, and with my other hand I use the flat-nosed pliers to grip the end of the eyepin wire and twist it around the base of the eyepin wire a couple of times, therefore locking in the bead, as shown above. Now snip off the excess wire end.
(If you would like a step-by-step photo tutorial of that process check out this post: Crystal & Pearl Bridal Earrings.)
Repeat, repeat, repeat! Aside from the charms, the small beads went on either side, and I added large, more ornate beads in between the small beads on the larger bracelet.

Voila!! You are done.


Don’t you love them? We do too!

If you love this tutorial then you are sure to love these Halloween jewelry tutorials as well:

Glam Halloween Necklace Tutorial

Jack Skellington Necklace Tutorial

Bubblegum Halloween Necklace Tutorial

Latest posts by Sarah Westover McKenna (see all)
- In Loving Memory of Logan Reed McKenna - June 11, 2026
- Chicken Tamale Casserole - May 15, 2025
- Harry Potter Bedroom - March 5, 2025
Really pretty bracelets. Thanks for sharing!
Really pretty bracelets. Thanks for sharing!