Bombshell Bling

Crafts, Recipes, Parties and More

  • Home
  • About
  • Tutorials
    • Baby and Kids
      • Kid Crafts
    • Beauty & Fashion
    • Crafts
    • Disney Love
    • Home Decor
    • Jewelry
    • Paint
    • Scrapbooking
    • Sewing
    • Washi Tape
    • Weddings
  • Printables
  • Recipes
    • S’mores Saturdays
  • Parties
  • Seasonal
    • New Year’s
    • Chinese New Year
    • Valentine’s Day
    • St. Patrick’s Day
    • Easter
    • Mother and Father’s Day
    • 4th of July
    • Back to School
    • Halloween
    • Thanksgiving
    • Christmas
  • Our Home
    • Baby Girl Nursery
    • Dr. Seuss Room
    • Little Girl Bedroom
    • Master Bedroom
    • Pokemon Bedroom
  • Family Fun
    • Disney
    • Dr. Seuss
    • How to Train Your Dragon
    • Learning Rocks
    • Reading Rocks
  • Randomness
    • Family Life
    • Mental Health
    • Sunday Spotlights

Dr. Seuss Room: Simple Window Valance Tutorial

June 2, 2014 By Sarah Westover McKenna 2 Comments

7 shares
  • Facebook
  • Twitter

*  I received this fabric from The Ribbon Retreat free of charge.  All designs and opinions are 100% my own.

Tutorial for making a window valance in minutes!  I need this!

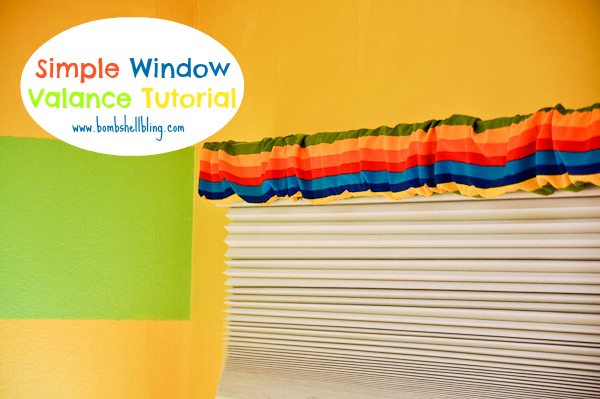
Hello, hello!  Today I have another installment for you in the Dr. Seuss room series.  Have you see my son’s Dr. Seuss bedroom?  It is so wild and colorful, and I love it with all of my heart!  Today we are going to talk about the simple window valance that I made for his room.  I didn’t want to do anything major for curtains, and this tube valance was a perfect way to make something CRAZY simple that still gave the window a finished look and a bit of oompf.  Let’s get started!

For my son’s window valance I used the Bright Stripes Celebrate Seuss fabric from The Ribbon Retreat.  I used three yards of it, but you may not need that much.  Let’s talk about that now.

Dr Seuss Valance-1
The first thing that you will need to do is measure your window’s width.  Over my son’s window was the valance rod (here is an example of a valance rod) that my mom put up 20 years ago, which is flat and wide.  It stretched over the window to be about 86 inches long and 3 inches wide.  I wanted plenty of room in length to scrunch the valance up a bit so that it didn’t have to be perfectly flat, since this is a silly Dr. Seuss room, after all, and it obviously had to go all the way around in width, so I cut a strip of fabric that was 8 inches wide and 108 inches long (three yards).  Since it is only 8 inches wide I could have gotten all of the length and more from one yard of fabric, but I chose not to because I thought that the pattern would be very difficult to match up on the seams, and I knew I would use the rest of the fabric for my throw pillows and other projects later on.  I actually wish I had made it even longer or even doubled the length so it would have been super scrunched up, but I do like it the way that it turned out.

Dr Seuss Valance-2
Once you have cut your strip iron your fabric.  At the ends fold and iron the ends about 1/2″ and sew them into place as shown.

Dr Seuss Valance-3
Now simply fold your fabric in half lengthwise (or the “hot dog” way as I would say to my elementary students—not the “hamburger way) so that the right side of the fabric faces inward, as shown, and sew the tube shut.

Dr Seuss Valance-4
Turn your tube inside out and go slide it onto your valance rod!  Can you believe how SIMPLE that was?? Score.

Dr Seuss Valance-5
Be sure to check out the rest of the Dr. Seuss room tutorials, and have a great day!

Tutorial for making a window valance in minutes!  I need this!

  • Bio
  • Twitter
  • Facebook
  • Google+
  • Latest Posts
Sarah Westover McKenna

Sarah Westover McKenna

Sarah is the scattered creative mind behind Bombshell Bling. A former elementary school teacher and a current stay-at-home mom, she loves developing her creativity through her blog and her jewelry design business, Bombshell Bling Jewelry. Sarah is a lover of all things vintage, colorful, and BLING. She is also a sweets addict with a major obsession with s'mores.
Sarah Westover McKenna

@bombshellbling

Follow @bombshellbling
Sarah Westover McKenna

+Sarah Westover McKenna

Sarah Westover McKenna

Latest posts by Sarah Westover McKenna (see all)

  • In Loving Memory of Logan Reed McKenna - June 11, 2026
  • Chicken Tamale Casserole - May 15, 2025
  • Harry Potter Bedroom - March 5, 2025

Share this:

  • Share
  • Share on Facebook (Opens in new window) Facebook
  • Share on Pinterest (Opens in new window) Pinterest
  • Share on X (Opens in new window) X
  • Email a link to a friend (Opens in new window) Email
  • Print (Opens in new window) Print
7 shares
  • Facebook
  • Twitter

Filed Under: Baby and Kids, Crafts, Dr. Seuss Room, Home Decor, Our Home, Sewing, Tutorials

« Sunday Spotlight: A Night Owl Blog
Summer Stash Giveaway »

Comments

  1. Stephanie says

    July 14, 2020 at 12:12 am

    What paint colors did you use for the stripes and the yellow?

    Reply
    • Sarah Westover McKenna says

      July 14, 2020 at 9:55 am

      I’m sorry, but I can’t remember! :/

      Reply

Leave a Reply Cancel reply

Your email address will not be published. Required fields are marked *

SUBSCRIBE

Thank you for subscribing!

There was an error submitting your subscription. Please try again.

Top Posts

Wristlet Key Fob and Card Wallet Free Sewing Pattern
Buffalo Chicken Dip Recipe:  An Easy Crowd Pleaser
Quilted Laptop Sleeve- Free Sewing Pattern
DIY Fabric Lanyard and Badge Holder - Free Sewing Pattern
S'mores Popcorn Recipe: S'MORES SATURDAYS IS BACK !!!
In Loving Memory of Logan Reed McKenna

Archives

Disclosure and Privacy Policy

Blog Parties I Link To

Archives

Copyright © 2026 · Tasteful theme by Restored 316

Copyright © 2026 ·Tasteful Theme · Genesis Framework by StudioPress · WordPress · Log in