* This fabric was sent to me by Modern Yardage. The idea and opinions are my own.

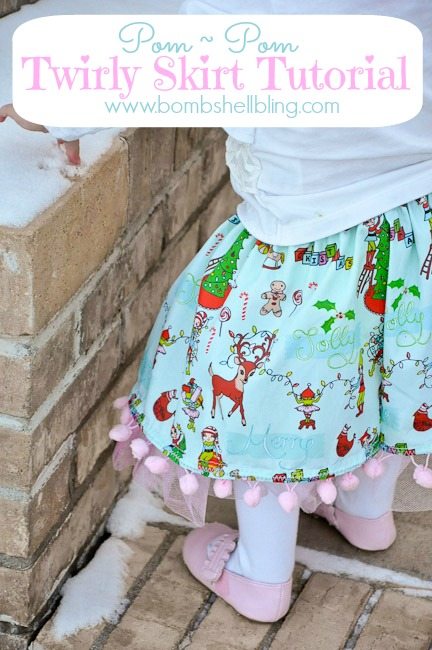
I was so excited to get some of this DARLING fabric in the mail last week to whip up a festive little ensemble for my little princess! It is made by Modern Yardage and it is called Santa’s Little Helpers in Candy. Isn’t it the CUTEST?! I just love it! It has a sweet, retro feel and I love to mix it up occasionally with untraditional colors for Christmas.

I know this tutorial is coming super close to Christmas, but the good this about it is that it can be adapted to any holiday or season or event. Switch up the fabric and it’s a pom pom party all year round! Yee haw! I think I will be making a Valentine’s Day one for The Little Princess with the leftover pom pom trim from this skirt.
To make this skirt I used about a yard of fabric, a roll of glittered tulle, and miniature pom pom trim. The first thing to do is to measure your child. I have a petite 20 month old. I wanted to measure my little girl’s actual body, but I kept forgetting to do it until after she went to bed, so finally I just grabbed a skirt that fit her well and measured it. I upped the measurements quite a bit so that it would be a bit baggy on her now and fit her again next December. Her waistband now measured 18 inches, and the length on her skirt was 8 inches. I decided to add a few inches to each to allow room for growth, so it was 21 inches for the waist and 11 inches in length. Before you cut—THIS IS IMPORTANT—you need to know that to make a skirt twirly and swirly you need to DOUBLE the waist measurement.
Here are the cuts that I made:
* one piece of fabric that is 11 inches by 42 inches
* a piece of glitter tulle (mine is from a spool) that is 84 inches long (double the twirly skirt length since you will be ruffling this)
* a 21 inch long piece of 1/2 inch wide elastic
* 42 inches of miniature pom pom trim

I began by creating the hem on the bottom of the skirt. To do so, iron 1/4 inch of the fabric under as shown.

Now fold the hem another 1/4 inch and iron it into place so that the rough end of the cut fabric is completely trapped and won’t fray when it is washed.

Sew the hem that you have created firmly into place with a straight stitch.

Next you will add the miniature pom pom trim to the bottom of your skirt. Carefully pin the trim in place along the bottom of your skirt. This was annoyingly tedious, I’ll admit it, but it was worth it. When my little gal saw the skirt she grabbed the pom poms and literally squealed with glee. I love that she loves pretty things. She is her mother’s daughter, that’s for sure!

I wanted to ensure that the trim would be securely fastened to my skirt, so I used a zig zag stitch to sew it on. Go slowly and be sure to backstitch at the beginning and end.


Next I made the tulle ruffle. I unrolled 84 inches of tulle (twice the length of the skirt) so that I could ruffle it and it would be really flouncy and cute. In order to ruffle something well you should always double the goal measurement. That’s a rule of thumb that my sister taught me. It’s not sewing doctrine, but it works.

Fold the tulle in half and baste along the entire length, which means using a very long stitch and NOT backstitching and the start or finish.

My tulle gathered up quite a bit on its own during the sewing process, which was handy. If yours does not gather on its own then grab one of the strings at the end of the tulle and gently pull it and push the tulle to ruffle it, as shown below.


Now carefully pin it to the bottom of the skirt under the pom poms, as shown, being sure the pin and space and scrunch the tulle ruffle evenly. Be thorough! Again, it’s tedious but worth it.

Next I used a normal straight stitch to secure the tulle firmly to the skirt.

Time to sew together the two sides of the fabric so that you will have a circle instead of one long strip. Fold it in half and lay the right sides together (these are the short sides) and stitch up the sides.

Iron open the seam so that it was lay better against that sweet little body.

Next you can iron a 1 inch hem all the way around the top. This is forming the casing for your elastic.

Sew the casing down but DO NOT CLOSE IT COMPLETELY! Leave a 1 – 2 inch opening where you will be able to slip in the elastic.

Cut your elastic to the appropriate length. Mine was 21 inches. Grab two safety pins. Pin one end of the elastic to the skirt. Put a pin through the other elastic end, as shown below.

Thread the loose elastic/safety pin end through the opening into the casing. Use the pin as something to grip and push and scrunch it through the entire casing until it comes out the other end, as shown below.


Once I get my elastic all the way through a skirt I always zig zag stitch the actual elastic to make it super secure before I sew the casing shut.

Now allow the elastic to slide into the casing completely and use a straight stitch to close the opening in the casing.

Turn the skirt inside out and you are DONE! Voila! So fun, right?!

And now I will be signing off for awhile. A little virtual Christmas card will be popping up on Wednesday, but then I will not be back until this weekend, when I will be sharing with you some fun New Year’s Eve accessories and noise makers for kiddos using jingle bells—especially the jumbo ones I got from Oriental Trading Company—so grab some jingle bells while they are on clearance this week and then stay tuned!

TTFN: Ta Ta For Now!! Have a lovely holiday week!

Latest posts by Sarah Westover McKenna (see all)
- Harry Potter Birthday Party - March 22, 2019
- Christmas Caramels - December 14, 2018
- Christmas Sugar Cookies Recipe - December 12, 2018
What a cutie in that skirt! The fabric looks great.
Sarah, this is just the sweetest little skirt! I have a niece that will be the perfect age in a few months that will love this. (She’s not walking yet!) I have pinned it and will make one for her next year. Thanks for the simple tutorial. Merry Christmas!
Send me a pic when you make it! 🙂
ADORABLE! I need to make one pronto. Which probably means 2 months from now. Valentines day, baby!!
Haha. Let’s make them together! You bring the fabric, I have the tulle and pom poms!
What a cute skirt!! I love that you added tulle and the pom pons. It’s absolutely adorable!! Have a very Merry Christmas!!
So cute, Sarah!
That is one super cute skirt! Fabulpus fabric too!
Merry Christmas!
Oh my goodness! My heart just melted! Thank you for using my fabric for your daughter’s skirt, she looks SO cute in it. Love it!!!
Thank YOU for creating such a darling fabric!!
Wow! This is your design?
I’ve literally just found this post and have fallen in love with the fabric but can’t find it for sale anywhere!
Is there any way I can buy some from you?
Thanks!
Thank you for your kind words! I love this fabric too. I do not have any left to sell you, but I found it at Modern Yardage. Try their site. Good luck!
This is darling. I love the fabric. It’s too precious to not copy….gotta make one too. I’ll find a little girl at church to make it for. I found you via Link Party Palooza. Thanks for sharing. Happy New Year to you.
So adorable! I just love it and the trim!! Thanks so much for linking up!
Thanks, Amy!!! xoxo
How stinkin’ cute! thanks for sharing!