With cooler weather on the way, it’s almost scarf season again! And while a heavier scarf is good for the cold winter months, for most of the year I love a lightweight scarf. This boho scrap fabric patchwork scarf is my new scarf for fall, and I’ve got a tutorial for you showing how to make one. You won’t believe where I got all the beautiful fabrics! Hint: It’s not the fabric store.

I am so in love with the bright patchwork on this scarf!! The mix of colors and patterns is so bright and happy. There’s no way I could have found this wonderful mix of color and pattern from fabric store yardage.

I’ve got greens, reds, and oranges with a pop of turquoise here and there. And while most of the fabrics are sheer, there are some opaque fabrics thrown in to mix things up.

And the fabrics are all so lightweight and dreamy! The lightweight fabrics drape beautifully, and the fabrics are so soft against my skin.

I’ve got a tutorial below showing how you can sew a boho scrap fabric patchwork scarf of your own. Because the size/shape of scraps vary from rug to rug, this project is a little less “step by step” and more a general process to follow.
My finished scarf measures approximately 10” wide x 68” long.

Where to get the fabric
I’ve had the idea for a lightweight patchwork scarf lurking in the back of my mind for the past couple of years. How beautiful would it be – especially with sheer fabrics mixed in. But the problem has always been the how. How to get a mix of lightweight and sheer fabrics without breaking the bank? And how to join them so I could keep the sheer aspect but where seam allowances weren’t hanging out everywhere?
And then a couple of weeks ago I saw a TikTok of someone disassembling a scrap fabric rug to harvest the scraps. The stripes in the rugs are actually bunched up fabric scraps. The scraps were so pretty, and there are so many to be had from a single rug! Mostly the scraps are sheer and very lightweight – the exact type of scraps I wanted to use for my scarf.
I ran out that weekend and bought one for myself from 5 Below. (If you don’t have a 5 Below, or your 5 Below doesn’t have these rugs, you can usually find them at other discount stores as well.) After pulling apart about a third of the rug, I already have a huge pile of scraps just waiting to be used for patchwork scarves and other scrap fabric projects.
This project uses only a small portion of the scraps you’ll get from one rug. There are all kinds of things you can use these scraps for – like these scrunchies! I’m planning on making some from my extra scraps.
How to finish the seams
I tried several types of seam finishes before I finally settled on the one I used. With fabrics this lightweight, a flat fell seam was bulkier than I wanted. I thought about lining the scarf (to avoid the raw edges altogether) but then the scarf wouldn’t’ be as sheer or as floaty as this one is. In the end, I decide to press the seam allowance open and then zig zag down the center. This finish does leave some raw edges (and a bit of fraying) on the back side of the scarf, but the seam allowances are mostly sewn down and camouflaged so they’re not noticeable. The zig zag stitches will help keep the fraying to a minimum and also strengthen the seams without adding too much bulk.

I also think the zig zag stitch makes a nice accent on the right side of the scarf. All the seams have a pretty little zig zag stitch on top of them.

I’ll describe it in more detail in the tutorial below.
How to make a Boho scrap fabric patchwork scarf:
Supplies
1 scrap fabric rug like this one from 5 Below.

RST = Right Sides Together
Prep
The first thing you’ll need to do is disassemble your rug. Take a pair of scissors and start snipping at the threads that hold the fabrics together. The first couple of rows of fabric are pretty slow, but after that it gets faster. Just pull the strips out and trim the threads as needed.

Not gonna lie, this step is also a lot of fun. Each stripe of fabric is a little surprise because you often don’t see what the overall design of the scrap is until you pull it out.
I like to sort the fabrics by color as I’m pulling them out. This makes it easier to choose the fabrics for your scarf. These are my piles of red and orange scraps that I pulled from my rug.
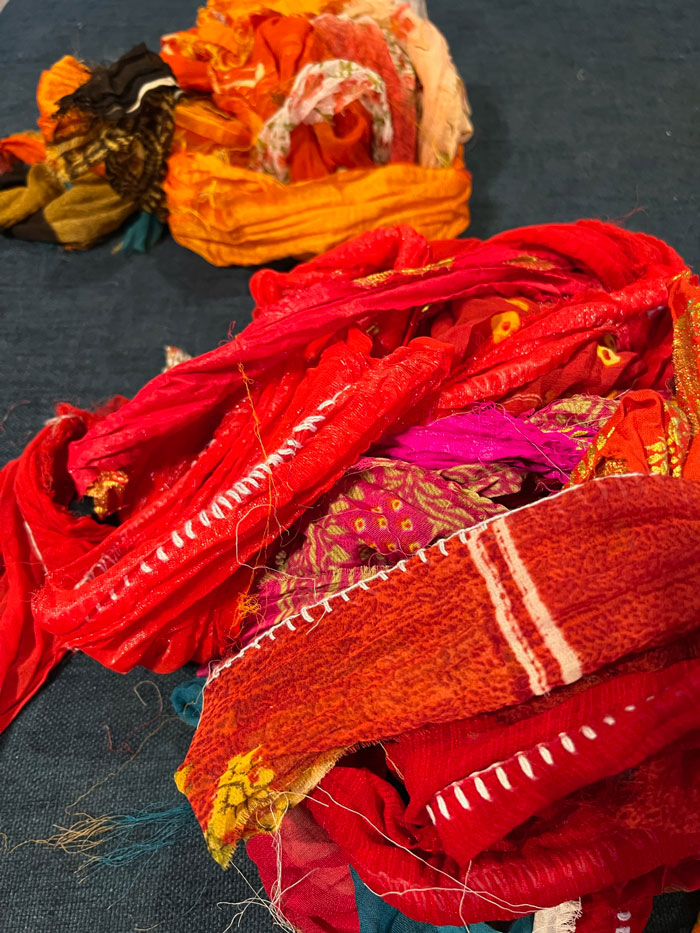
After you’ve got a nice pile of fabric scraps, choose the ones you want to use for your scarf. I chose to use a palette of green, red, and orange for my scarf. I think it’s a good idea to narrow the palette but you can also just choose whichever scraps speak to you.
The scraps are all super wrinkled at this stage because they’ve been all bunched up in the rug.
Go ahead and iron them so you can get a better sense of the shape and print. The fabrics are almost all synthetics so use a low setting on your iron so you don’t melt the fabrics.
I normally hate ironing but in this case it’s pretty fun because you can see a long wrinkled piece of fabric like this

become this bit of gorgeousness!

Trim the Scraps
The fabrics as they come out of the rug are mostly strips but they’re all wonky and crooked. After you iron them, you’ll need to trim them into rectangles.
In order to understand what sizes to trim your scraps, you’ll first need to know a little about how they’ll get sewn together. The rectangles will first get pieced together end to end to make three long strips, which are then sewn together to make the scarf. Each of the three long strips is a different width, but within that strip every rectangle needs to be the same width.
With that in mind, trim your scraps into long rectangles either 3.5” wide, 4” wide, or 5” wide. You can make the rectangles any length, though generally you’ll want to make them as long as the scrap allows. You’ll need enough rectangles of each width to create a strip 72” long.
What do you do with scraps that are too narrow? That’s easy – just sew them together to make a larger scrap! I did that in a couple of spots on my scarf and I actually think it looks even better to have some pieced scraps mixed in. Just use the same method for finishing your seams as described in the next section and it will blend right in.
It’s a good idea to plan the placement of your pieces as you cut them. I laid everything out on my dining table. If you look carefully, you can see that I was still in the process of trimming, as most of the pieces in the back are already trimmed while the ones in the front are still wonky.

Speaking of looking carefully, that bit of brown near the top left of the photo is a vintage turntable my husband is in the process of repairing. It was too big to clear off the table for the photo, lol.
Sew the Pieces Into Strips
So now you’ve got all your pretty scrap fabric rectangles laid out in long strips how you like them. Now let’s sew them together into a scarf! The first step is to sew the rectangles in each strip end to end:
First, place two pieces RST and sew with a scant ¼” seam allowance.

Press the seam open.

Zig zag across the stitch line to secure the seam allowances. I used a zig zag stitch with a width of 3.5 and a length of 2.25.

Continue sewing pieces together until you have three long strips of patchwork fabric.
The most efficient way to do this step is to do it factory style, first sewing all of the rectangles together and pressing the seam allowances open THEN going back and zig zagging over all of the seams.
Sew the Strips Together
Now, sew those long strips together using the same seam finish as you did in the previous step:
Place two strips RST and sew together with a scant ¼” seam allowance. This will be a very long seam! Press the seam open, then zig zag across the stitch line.

Illustration only shows the overall shape of the strips, not the individual pieces that make up the patchwork.
Sew all three strips together to make a long block of patchwork fabric.

With all the patchwork and super long seams, the ends of your scarf are probably not even. Trim the ends of your scarf even. Your scarf is almost finished!!
Hem the Edges
Finish the long sides of your scarf with a ¼” double fold hem. That means first folding the raw edge to the wrong side ¼”, and then folding that edge over another ¼” to encase the raw edge. Sew close to the folded edge.

Illustration shows just a portion of the scarf. You would need to do this hem down both long sides of the scarf.
These thin, sheer synthetic fabrics won’t hold a pressed edge nor will they hold a pin very well either, so I just folded the edge into a double fold hem as a sewed. The fabrics are slippery and sometimes hard to manage like this, but just be patient and
Finally, finish the short sides of your scarf with the same double fold hem.
If parts of your hem look wonky and misshapen when you’re done, don’t panic. Mine had some of that, too! Remember these fabrics are super lightweight so they’re easy to get warped out of shape. But you can usually ease them right back into shape. With a little bit of ironing, mine looked just fine.
Now stand back and admire your gorgeous Boho scrap fabric patchwork scarf!

If you love this tutorial you will love these tutorials as well:

Easy Fleece Cuffed Beanie – Free Sewing Pattern

Patchwork Pocket Wristlet Pouch

Latest posts by Anne Weaver (see all)
- Spring Flower Tote Bag – Free Sewing Pattern - April 6, 2024
- St. Patrick’s Day Shamrock Banner Free Sewing Pattern - March 7, 2024
- Upcycled Sweater Valentine Zipper Pouch Sewing Tutorial - February 12, 2024
Thank you so much for sharing. after seeing your article, I immediately went and ordered the Chindi rug.
WOW who knew all these fantastic fabrics were in a rug. Then I couldn’t find your article. Oh no!!! I looked all over – spent hours and days looking at Pinterest, my recent files.etc. DANGit!! Finally, my daughter showed me how to get my “history.” Whew!
SO, now i can play. Curious – do you wash any of this beforehand? Or do you give out instructions for cleaning the scarf? I think you may have started something. The price of the rugs will go up as more people find out about this technique.
So glad you like my Chindi scarf! If you love fabric scraps, you’ll love all the fabrics you’ll find in a Chindi rug! And I’m not going to lie, unravelling the scraps is SO MUCH FUN. 🙂 I did not prewash any of the fabrics. They’re all narrow and of unknown fiber content so I was afraid they’d get all tangled up in the wash. The scraps from my rug didn’t look (or feel) dirty at all so I just went it. I did spray a little water on them when ironing to steam out the wrinkles. If you did want to prewash the fabrics, I’d suggest putting them in a lingerie bag and washing on cold and air drying.
I’m confused – are you Anne Weaver? Orange Bettie? or Sarah? not sure who to write to.
Wonderful tute on the Chindi scarves. Questions – did you wash the chindi pieces before sewing? or after you made the scarves? Some of the fabrics seem kinda stiff. Do you have a picture of your finished scarf laid out??
Hi! I’m Anne AKA Orange Bettie. (I have my own blog but I also write posts here at Bombshell Bling.) I’m so glad you liked my Chindi scarf! I didn’t wash the chindi pieces before sewing. With the narrow pieces of unknown fabric content I was afraid they’d shred in the washer. Most of my pieces were lightweight and drapey once I ironed them flat, but I did have some that remained stiff. I just chose not to use those pieces for this project.
The scarf is too long to get a photo of it all laid out. I did get a photo of some of the rough layout on my table before sewing it together, which may help you visualize (You can see the photo under the Trim the Scraps heading in the tutorial). The best way I can describe the layout is just three long strips, each of them pieced from rectangles of fabric. I just cut rectangles from my scraps as long as I could and pieced them end to end to make the strips. Because the scraps were different widths and I wanted to maximize the use of the scraps, I ended up with three different widths for those long strips. That way I could piece my wider scraps together in one strip and my narrower scraps together in narrower strips. Then I pieced sewed these strips together to make the scarf.