Bombshell Bling

Crafts, Recipes, Parties and More

  • Home
  • About
  • Tutorials
    • Baby and Kids
      • Kid Crafts
    • Beauty & Fashion
    • Crafts
    • Disney Love
    • Home Decor
    • Jewelry
    • Paint
    • Scrapbooking
    • Sewing
    • Washi Tape
    • Weddings
  • Printables
  • Recipes
    • S’mores Saturdays
  • Parties
  • Seasonal
    • New Year’s
    • Chinese New Year
    • Valentine’s Day
    • St. Patrick’s Day
    • Easter
    • Mother and Father’s Day
    • 4th of July
    • Back to School
    • Halloween
    • Thanksgiving
    • Christmas
  • Our Home
    • Baby Girl Nursery
    • Dr. Seuss Room
    • Little Girl Bedroom
    • Master Bedroom
    • Pokemon Bedroom
  • Family Fun
    • Disney
    • Dr. Seuss
    • How to Train Your Dragon
    • Learning Rocks
    • Reading Rocks
  • Randomness
    • Family Life
    • Mental Health
    • Sunday Spotlights

Quick and Simple Tie Onesie

July 27, 2015 By Laura Webb Leave a Comment

  • Tweet
  • Pin It

Quick & Simple Tie Onesie Tutorial

Hello! It’s Laura again, Sarah’s little sister. I loved showing you my nursery and meal planning calendar, so today I will be showing you a super simple sewing project that makes a fabulous baby shower gift: a tie onesie. Such a cute way to dapper up your little guy for a special event.

First, cut out a stencil on an index card that looks the right size for the onesie you are using. I made mine a little skinnier than others I have seen because, let’s face it, no one wants a fat tie these days. Right?

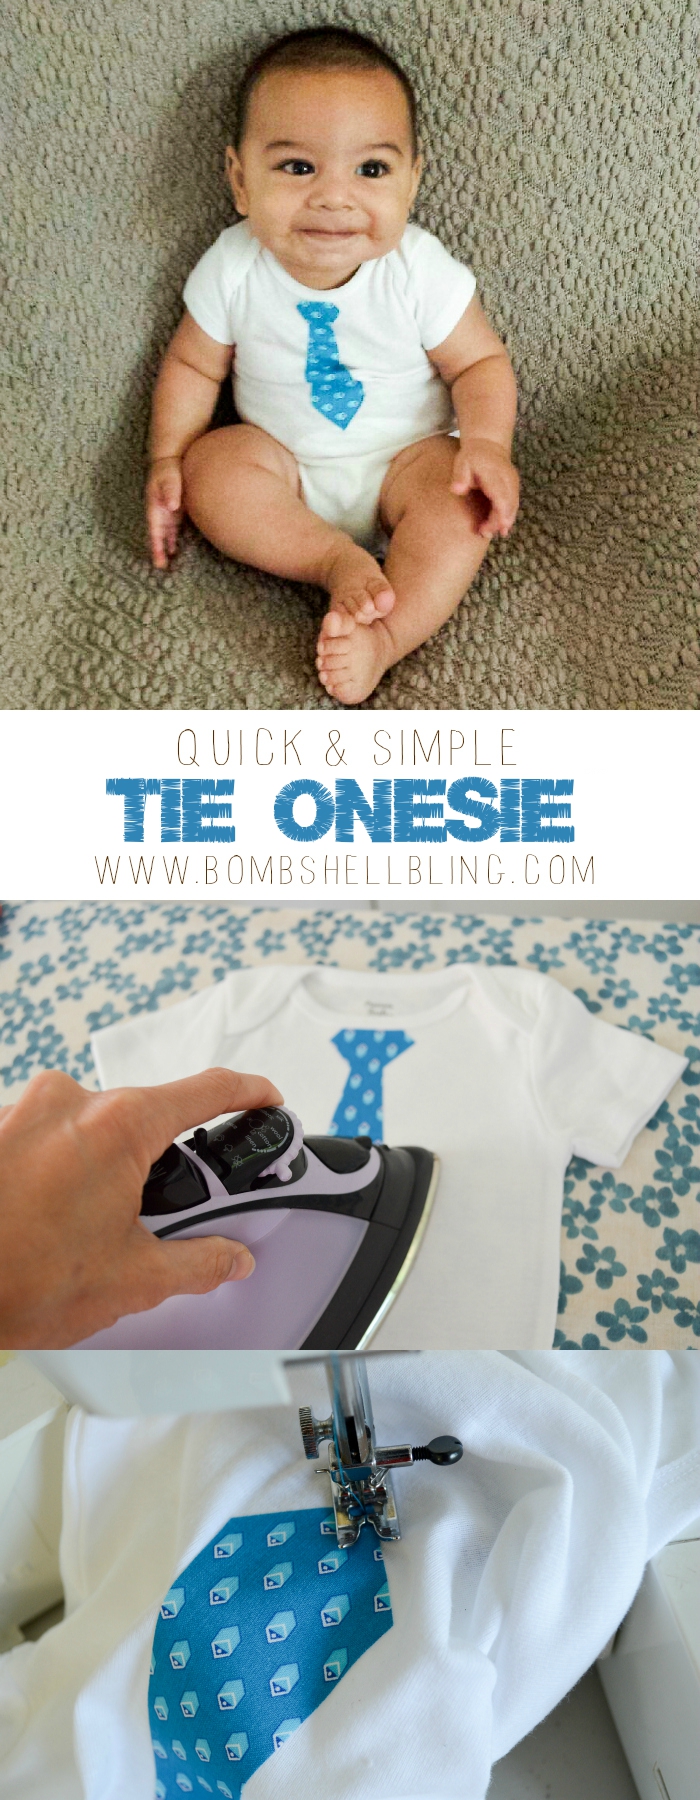
One thing is crucial to the success of this project – heat & bond. Have you used it before? It is amazing! Just follow the instructions – so simple. Iron it on to your fabric, peel off the paper, and voila! It is sticky and adheres with just the heat of an iron. Try some!!

Now the order that you do this is up to you, but I typically cut out a small rectangle of my fabric and a small rectangle of heat & bond and use my iron to fuse the fabric to the heat & bond first. Then I use the stencil I just made to trace a tie onto the pre-fused fabric. You could also cut one tie out of both things separately and fuse them after. It’s up to you but I am lazy and like to cut once. Here is my tie, all cut out and ready to go.

Bow Tie Onesie-1

Now peel off the heat & bond so your tie is ready to iron on. Place it carefully and then iron that bad boy in place. Be careful because once it is stuck, there’s no moving it.

Bow Tie Onesie-2

Bow Tie Onesie-3

After the ironing, your tie will be stuck on pretty well, but it won’t last a few washes. You will need to stitch it down. I use a short stitch length and get as close to the edge as I can to make it look professional.

Bow Tie Onesie-4

Bow Tie Onesie-5

Ta da! That’s it. Easy peasy.

Bow Tie Onesie-6

Now wrap it up cute . . .

Bow Tie Onesie-7

And you have the easiest shower gift of all time. People will be so impressed. Don’t tell them how easy it is. 😉

I made one of these for my friend a few months ago. I think her son likes it, don’t you?

Bow Tie Onesie Outfit-1

Look at this scrumptious butter ball. I want to eat him up. Nom nom nom.

Bow Tie Onesie Outfit-2

Bow Tie Onesie Outfit-3

Be sure to check out Laura’s other awesome projects:

Retro Inspired Baby Nursery-3

Retro Inspired Baby Nursery

Paint Chip Menu Planner-10

Paint Chip Menu Planner

You may also enjoy this baby sewing tutorial, one of the most popular posts of all time on this site:

Free baby sleep sack pattern - simple to make with cuddle fabric!

FREE Baby Sleep Sack Pattern & Tutorial

  • Bio
  • Latest Posts
Laura Webb

Laura Webb

Laura is a talented mother of two who loves sewing, Seinfeld, zumba, and chemistry.
Laura Webb

Latest posts by Laura Webb (see all)

  • The Princess Bride Family Costumes - October 23, 2016
  • Pumpkin Butter Breakfast Cookies Recipe - October 19, 2016
  • Dopey the Dwarf Costume Tutorial - October 26, 2015

Share this:

  • Share
  • Facebook
  • Pinterest
  • Twitter
  • Email
  • Print

Filed Under: Baby and Kids, Crafts, Sewing, Tutorials

« Mini S’mores Cheesecake Recipe
DohVinci Frames Kid Craft »

Leave a Reply Cancel reply

Your email address will not be published. Required fields are marked *

SUBSCRIBE

Thank you for subscribing!

There was an error submitting your subscription. Please try again.

Top Posts

Apricot Chicken
Green Chili Cream Cheese Enchiladas
Buffalo Chicken Dip Recipe:  An Easy Crowd Pleaser
25 Perfect Harry Potter Printables
Boxy Pencil Pouch Sewing Tutorial
8 Recipes Using Grilled Chicken Strips & a SUPER Simple Way to Make Your Child's School MONEY!  (Really!)

Archives

Disclosure and Privacy Policy

Blog Parties I Link To

Archives

Copyright © 2021 · Tasteful theme by Restored 316

Copyright © 2021 ·Tasteful Theme · Genesis Framework by StudioPress · WordPress · Log in

loading Cancel
Post was not sent - check your email addresses!
Email check failed, please try again
Sorry, your blog cannot share posts by email.