This simple sewing tutorial will teach you how to make a ribbon skirt for your little girl using only ribbons and a bit of elastic!

* I received this ribbon free of charge from The Ribbon Retreat. All designs and opinions are 100% my own.
Good morning! I am so excited to share my festive St. Patrick’s Day Ribbon Skirt Tutorial with you today. I love love LOVE making fun holiday ensembles for my kids! It’s made entirely of ribbons, ribbons, and more ribbons. Do you want to learn how to make a ribbon skirt for your own little leprechaun? This is the skirt that was shown Monday in the pictures of my little gal in her St. Patrick’s Day Rhinestone Headband.
Ok, let’s talk about ribbon skirt measurements. THIS IS IMPORTANT….and a bit lengthy. I don’t know how exactly to explain to you how I figured out my measurements. I am going to try my best to explain my process, but, to be honest, it was a bit of trial and error. I apologize for not having exact measurements for you.
My little lady is almost two, but she is super duper petite, so you will have to adapt this for your child. She wears a size 18 -24 month clothes pretty roomily, just as a reference. I only needed one package of the ribbon mixes for my skirt, but if your little gal is any taller than mine you will probably want two of the ribbon mixes in order to have a long enough skirt. I had measured from her waist to her knee and determined that if I cut the ribbons in half I could stack them all up and it would be the right length.
Now let’s talk about width / circumference of the skirt. Each ribbon is about 2 yards long, and I knew that my gal was much thinner than that (as most are, obviously). The thing about these ribbon skirts is that you don’t want them to be wide and billowy like a twirly skirt. Ribbons don’t drape and fold nicely like fabric because they are so stiff, so you want the skirt’s circle to be wide enough to slide on and off easily, but not so wide that it folds and looks funny. What I did was use a soft measuring tape to measure loosely around her waist and hips. I made sure to move it up and down to see if it would realistically work after it was sewn.
Once I measured I determined that if I cut the ribbons in half it would work well. After I sewed them together I realized it was far too wide, so I ended up cutting about ten inches off after I held it up to her body and figured out how much excess ribbon I had. I ended up wasting some ribbon, which was sad. But I do love how it turned out. Hopefully my trial and error will help you find simpler success.
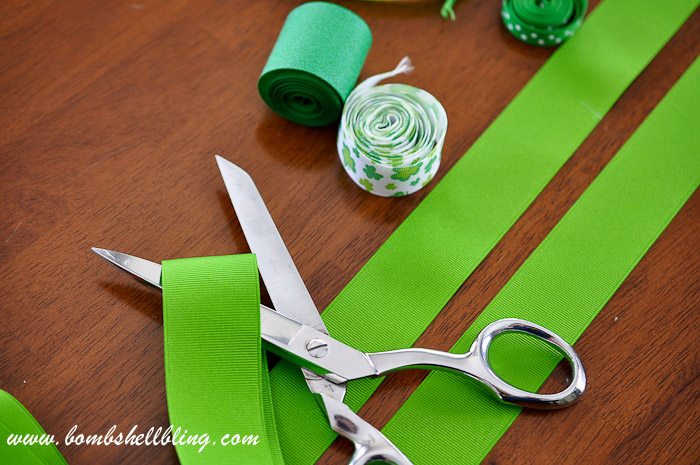
Done with the rambling, and on to the pictures and tutorial. All you need is ribbons, ribbons, and more ribbons, along with a bit of elastic. I used the Just My Luck ribbon mix. If you have a bigger gal than I do you’ll probably want to grab two mixes. Cute stuff, huh?!

As I told you, I cut them in half, and then I laid them out in a pattern that I liked.


Now, this process is pretty straightforward. It’s all straight lines. It’s too hard to pin things that only overlap such a small amount, so I just held them carefully and sewed slowly. I messed up every once in a while, but I fixed that pretty simply. Let’s take a look at the process.


I just kept lining up the ribbons and repeating the same process over and over and over.

If you are not a confident seamstress you may want to stick with only thicker ribbons. The super skinny ones were a bit tricky. Here is how I handled that — I overlapped the larger ribbons only on the back of the super skinny ribbon. In fact, you couldn’t even see the skinny ribbon from the back, but it still looked great from the front. See pics below.


The back view of the hidden thin ribbon (above) and the front view (below).

Here’s what happened when I messed up. As you can see in the picture below, I wavered while sewing and part of the ribbon line was left gaping open. So I simply went back and resewed it. I did a bit of backstitching at the start and end of the gap. It’s not perfect, but in the front it still works. As my friend Jessica’s grandma always says about sewing mistakes, “You won’t see that from a galloping horse.” Whatever that means. Haha.


At this point I held it up around my daughter and saw that it was much too large around the hips. I ended up cutting off about 10 inches.

Now put the right sides together and sew the two edges together so you have a circle skirt of ribbon.

Try to iron the ribbons to one side so the skirt will lie a bit smoother. Ribbons don’t iron particularly well because they are so stiff, but try. It gives the skirt a cleaner look overall.

Now sew a casing for the elastic. Just fold the large top ribbon in half and iron it.

Sew around the skirt to create a casing, but leave a space open for the elastic.

Measure your little one’s waist and subtract a couple of inches. Cut the elastic that long. (My little gal had a waist about 2 inches around, so I cut the elastic about 19 inches long.) Grab a couple of safety pins. Pin one end of the elastic to the skirt, and put the pin through the other end but don’t pin it to the skirt, as shown below.

Now push and gather and scrunch and pull until you have gotten that safety pin all the way around the waist and pulled out through the other end, as shown below.


Now sew the elastic ends together, wiggle them into the casing, and sew the opening in the casing closed.

You are done!! Simple, right? A bit tedious with all the ribbon, I know, but LOOK at the end result! Too cute, am I right?!


My little leprechaun is pleased with her ribbon skirt. 🙂 Do you like her headband? I shared the tutorial for that Rhinestone Headband yesterday. It’ll take about five minutes flat to make. Probably less. Truly.

Let me know if you decide to sew a ribbon skirt of your own! I would love to see pictures!

If you enjoyed this post then you may also enjoy these St. Patrick’s Day baby girl related projects:

Lucky Legs: How to Make Baby Legwarmers


St Patrick’s Day Rhinestone Headband

Latest posts by Sarah Westover McKenna (see all)
- Harry Potter Birthday Party - March 22, 2019
- Christmas Caramels - December 14, 2018
- Christmas Sugar Cookies Recipe - December 12, 2018
The daughter is adorable and so is the skirt. So cute!!
Really adorable on your little one! thanks for sharing on craft schooling Sunday!
Absolutely adorable, this turned out great!
This is such a fun and cute project! I would never have thought to try out making a skirt from ribbons, but now I want to!
You should link up to our new Creatively Crafty link party on Thursday. =)
That is adorable!! I love how it will be a one-of-a-kind! Thank you for sharing with us at the #HomeMattersParty
I love this skirt!! So cute – it tempts me to try and make something like it for my daughters birthday! I have picked you as one of my features for this weeks Wonderful Wednesday Blog Hop. Thanks for linking up with us 🙂
Cute and perfect for a St. Patrick’s princess! Thanks for sharing this with us on Throwback Thursday! Hope to see you next week!
Mollie
That is so darn cute (and so is your model!) I wish I could sew, every little girl I know would have one! Thanks for sharing at Throwback Thursday.
This is adorable! I would have never thought to sew ribbons together for a skirt but I love it! Thanks for the awesome idea!
So cute! Maybe I can see if my 7 year old would wear a ribbon skirt?! Great (easy) idea. Visiting from Pretty Pintastic Party.
Loving this cute little skirt. Thanks for sharing with us at Family Joy Blog Link Up Party. Don’t forget to join us tomorrow ( Sunday) and link up again. http://thinking-outside-the-pot.com/?p=3389
How clever! This project is adorable. Pinned and sharing. Thank you for joining us at Family Joy Blog Link-Up Party. I hope you will join our next party starting Sunday at noon EST.
Oh my goodness this is so smart! Thanks for sharing this too at Funtastic Friday! Pinning
I miss sewing skirts for my girls. This is so cute and an easy sewing project for a beginner. Thanks for sharing on Merry Monday.
The skirt came out super cute. Love the picture of your baby too! How would you wash it? (Hand wash?) I would be afraid of putting it in the machine.
I believe I did hand wash it.
What an incredible idea, to create your own fabric out of ribbon! Love it! Sharing and Pinning! 🙂 Lisa
That is such a cute skirt, and looks so neatly sewn.
This is such a cute skirt!
Adorable skirt for St. Patrick’s Day and a wonderful tutorial. Thank you for sharing at Snickerdoodle. I am featuring your little skirt at the party this week.