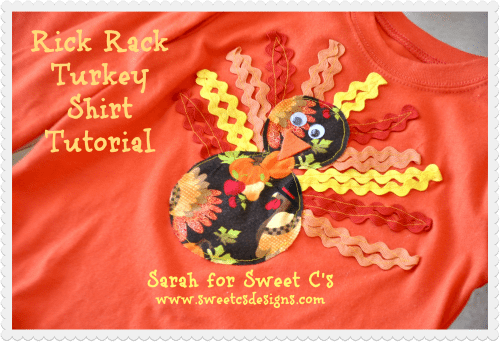
Last year I made this festive turkey shirt for my son as a guest post for Sweet C’s Designs. Because I made it RIGHT before the holiday I made it in a large size, and I am so glad that I did, because it looks like it will still fit this year! Yay! Now let’s get to the tutorial!

I always like to give credit where credit is due. I spotted the shirt shown above on Pinterest last year, and I was reminded of it again this year when I saw it featured on my cousin’s blog, Crazy Little Projects. I looked it up and there was no tutorial, just a picture. I thought for awhile about how I could use this picture as inspiration and adapt it for a little boy. I was going to leave the rick rack loose, like she did with the ribbons, but then my husband pointed out that on our wild three year old son and one year old nephew that was just begging for them to yank on them until they ripped the shirt. Point taken. So I decided to sew the rick rack down.

Ok, let’s get started. The materials that I used for this turkey shirt are the exact same materials I used for my little girl Thanksgiving top! Thrifty and fabulous looking in pictures!

Here are the supplies that you will need:
* Shirt in the color of your choice
* Thanksgiving/Fall fabric (I found mine at Joann Fabric and Craft Stores. Turkeys in top hats….cutest!)
* Rick Rack in the colors of your choice (I used yellow, red and orange.)
* Coordinating Thread
* A tiny square of orange felt
* Googly Eyes
* Glue for the nose and eyes (I used Fabric Mod Podge for the felt and hot glue for the eyes.)
* Lots of pins

Here goes nothing! Use random items from around your house to figure out what size you want your turkey’s body to be. As you can see, I used the top of the Mod Podge bottle and a cup for my turkey body.

Trace the two circles on top of one another on your fall fabric and cut out the turkey body.

Lay your turkey body in the center of your shirt and play with the rick rack until you decide how you would like it laid out. Cut the rick rack loops. Be sure that your rick rack is long enough for the ends to be fully tucked under the turkey body once you sew it on.

Now pin the rick rack loops onto the shirt. This is a little tricky, and you will end up having to mostly maneuver the rick rack with your hands as you sew anyway, but this step really helps keep everything a bit more steady. I seem to always pin through both layers of the shirts that I sew on, so I have figured out how to avoid that. I stick my quilting ruler underneath the top layer of the shirt and then the pin hits that instead of going through both layers. It works for me, so you may want to give something similar a try. It makes the pinning process so much quicker for me since I don’t have to be as careful.

Ready to sew? I decided that rather than switching out the thread on my machine I would use a mustard yellow for all of them, as well as the turkey body, for a contrasting look. Of course, that does mean you have to stitch a bit more carefully. I suggest going slow and stead here so that you can try to stay in the center of your rick rack. It doesn’t have to be perfect—goodness knows mine aren’t—but try to stay in the center as much as possible. When you near the top corner of your rick rack slow down and stop with the needle down (or put it down manually). Leave it down and turn the shirt around. Now you can continue sewing straight. That is my corner trick. Nothing super unusual, I’m sure, but it saved me to start doing that when I was a new seamstress and I thought that I had to keep sewing while I tried to “turn corners.” Yikes.

Now carefully pin your turkey body to the shirt so that the rick rack edges are all tucked in. You could applique around the turkey body. I originally planned to do that so that it would look more finished and polished, but I’m not great at applique, so I decided to just stitch around the edges since I was ok with a frayed, rustic look for this project. Stitch carefully since you will have to go over the thick rick rack.
Cut a triangle beak and attach it to your shirt. I used Fabric Mod Podge to attach mine. Now glue on the eyes. I used a hot glue gun, although I’m sure there is a better way. I just had mine handy and don’t need to wash it a ton.

Congratulations! Now you have a festive and fun Thanksgiving shirt for your little one! Pull out the camera and snap some holiday pics! What a little cheeser…

You should also check out the little girl Rick Rack No-Sew Onesie Tutorial that I made last year for my little princess. I can’t believe how much she has grown up in a year! Waaaaah!!

If you enjoyed this post you may also enjoy these posts:

50+ Thanksgiving Crafts, Recipes, and Activities for Kids

Make a Silly Turkey Placemat Using Fall Leaves

20 Activities to Teach Kids Gratitude

Give Thanks Frame
For more great ideas from all over the web be sure to follow my Thanksgiving Pinterest board.

Latest posts by Sarah Westover McKenna (see all)
- Harry Potter Birthday Party - March 22, 2019
- Christmas Caramels - December 14, 2018
- Christmas Sugar Cookies Recipe - December 12, 2018
I love ric rack and I love the projects you did with it! I found a bunch of rolls at a thrift store and have only made one thing with it so far. I would love to try your project with it! Great job!
What a great thrift store find!
This turned out so cute! Would love for you to share at our Kitchen Fun & Crafty Friday link party…just posted!:) http://kitchenfunwithmy3sons.blogspot.com/2013/11/kitchen-fun-crafty-friday-link-party-89.html
Thanks for sharing! Extremely cute and very boyish! So hard to find cute things for little boys of He-Men. My son is in the Army and doesn’t want his son in pin-tucks and smocking. The girls get cute things and brother wants his own Nana-made things as well. Keep up the good work! 🙂
Oh yes, this is even military approved I would think! 🙂