I recently made some quilted hot pads as a “happy day” present for my mom. That’s what our family calls little surprise gifts that you give for no reason except to make that day happy for someone. They are the most fun kinds of gifts to give!
My mom has told me several times since then how much she loves the hot pads and how pretty they are in her kitchen! I’ve got a tutorial for the quilted hot pads here.
I’m glad they’re pretty but what I love the most is that they make her happy.
I had a little extra fabric so I thought it might be fun to make another happy day for my mom, this time with a tea towel that matches her hot pads.
I’ve got a tutorial for you below.

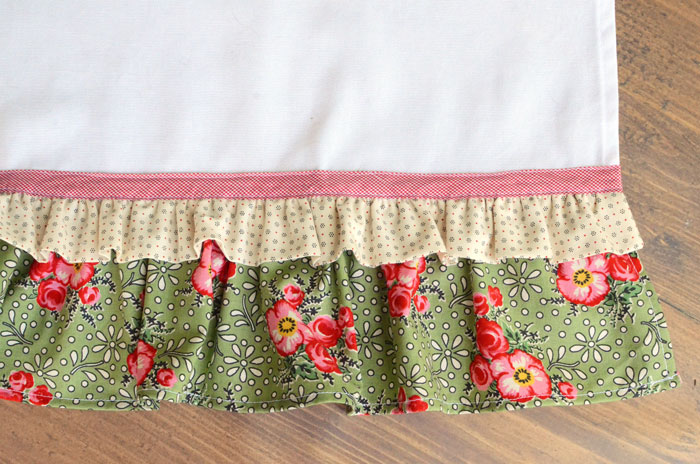
I love the ruffles made out of the vintage style prints! Her house is a 1920s craftsman so those vintage prints will fit right in. Especially in her kitchen that still has the original glass front cabinets.
And look at how pretty it looks with her oven mitts!

Like I said, I had some extra fabric left over from the hot pads. But not a whole lot of it, so adding ruffles to a tea towel was a good way to showcase the fabric without using too much of it.
The two ruffles and the accent trim feature all of the fabrics I used to make the hot pads. The long ruffle at the bottom is a nice, deep 5” long while the short ruffle is just an accent at 1.5” long.
You can display the towel folded up, or it would also look nice displayed unfolded to its full width and hanging over an oven handle.

I had planned on just buying a plain white kitchen towel to start with, but those were harder to find locally than I thought they would be. So I just made my own tea towel from plain white home dec weight cotton.
I’ve used home dec weight cotton for tea towels before, and it makes great towels! This pumpkin tea towel is one example – and there’s a free pattern for the applique!
The home dec weight cotton seems pretty stiff in the store, but when you prewash it will usually soften right up.
But making your own towel is entirely optional. If you’ve got a purchased towel that looks nice with your fabrics, use it and save yourself a few steps!
Materials
Towel – Purchased tea towel or 22” x 28” 100% cotton home décor weight fabri (Use 20” x 26” for a slightly smaller towel.)
Long ruffle – Quilting cotton 6” tall x 36” wide
Short ruffle – Quilting cotton 4” tall x 36” wide
Accent ribbon – 22” bias tape or wide ribbon

Make the towel
If you’re using a purchased tea towel, you can skip this step.
Hem all 4 sides of your 22” x 30” piece of fabric with a 3/8” double-fold hem. I like to miter the corners but it’s not necessary.
A double-fold hem is just like it sounds. The edge is folded over twice so the raw edge is completely encased. You can sew the hem in place by stitching close to the folded edge.
Sew the long ruffle
Hem the bottom and sides of the Long Ruffle piece with a ¼” double-fold hem.

Sew two rows of basting stitches across the top (unhemmed) edge of the Long Ruffle piece, with ¼” and 3/8” seam allowances. Don’t trim your threads

Pull the top threads to create gathers. Don’t pull too hard or too fast, or you’ll pop your threads.

Gather the Long Ruffle until it is the same width as your towel. Tie the threads at the ends to keep your gathers from slipping out.
Pin the Long Ruffle across the front of the towel, just above the towel hem. Stitch in place 3/8” from the top edge.

Sew the short ruffle
Fold the Short Ruffle piece in half lengthwise and right sides together. Sew down both sides with 1/4″ seam allowance.

Turn right side out.
Sew two rows of basting stitches across the top (raw) edge of the Short Ruffle piece, with ¼” and 3/8” seam allowances. Don’t trim your threads

Pull the top threads to create gathers. With two layers of fabric, these gathers will be a little bit tougher to pull than on the Long Ruffle. Just go slowly so your threads don’t pop.

As with the Long Ruffle, gather until the ruffle is the same width as the towel, then tie the threads to secure the gathers.
Pin the Short Ruffle on top of the Long Ruffle, with raw edges lined up. Stitch in place 3/8” from the top edge.

The top of the ruffles is pretty bulky now. Stitch across the top of the ruffles with a wide zig zag stitch to compress the layers. The zig zag stitch settings I used were a 5 width, and a 1.5 length.

Sew the trim
Now all we have to do is sew the trim down across the top of the ruffles to cover those raw edges.
Use a glue stick to glue baste the ribbon or bias tape across the towel so it covers the raw edges of the ruffles, leaving about an inch extra on each end. Iron the ribbon or bias tape with a hot iron to dry the glue.

Wrap the extra ribbon or bias tape to the back of the towel. Tuck the ends under and glue baste in place. Iron to dry the glue.

On the front of the towel, top stitch the ribbon or bias tape down to secure. Sew across the top and the bottom of the ribbon, close to the edges.

Your ruffle tea towel is done!


More wonderful sewing tutorials from Anne:


Soup Bowl Coaster Sewing Tutorial


Modern Hexagon Fabric Coasters

Latest posts by Anne Weaver (see all)
- Spring Flower Tote Bag – Free Sewing Pattern - April 6, 2024
- St. Patrick’s Day Shamrock Banner Free Sewing Pattern - March 7, 2024
- Upcycled Sweater Valentine Zipper Pouch Sewing Tutorial - February 12, 2024
Great tutorial! Can’t wait to try. And bonus for the homemade towels. They are so hard for me to find. Do you have a link to show an example of the fabric used? I get so lost trying to pick fabrics for towels at the store. Is it the duck fabric? Thanks!!
The ruffles are just made from a quilting cotton fabric.