*I received the vinyl and tool kit used in this post free of charge to review for Cricut. All ideas and opinions are 100% my own.
 Are you looking for a last minute festive outfit for your little lady for a New Year’s Eve party? Or maybe a birthday, other celebration, or just a fun day? Well then I have you covered with this balloon shirt! I used iron-on glitter vinyl from Cricut and it came together in a matter of minutes! I will even share the file with you below so you don’t have to worry about the layout! So let’s get going!
 Here are the supplies that I used for this project:
* Basic Cricut die-cutting supplies (Cricut Expression, Cricut Craft Room, Cricut Tool Kit, and a Cricut Cutting Mat)
* Cricut Iron-On Gold Glitter Vinyl
* A plain t-shirt. I always find mine at Walmart in the kids’ department.
* This Cricut Craft Room creation (using the cartridge Celebrate With Flourish): Balloon Shirt
 Measure your shirt to see how much space you have to work with. Now I will show you how to use Cricut Craft Room to create your own balloon grouping if you don’t like mine or want them bigger.
 Go into Cricut Craft Room (it’s free to download!) and pull the balloon you want. I chose one from the Celebrate with Flourish Cartridge. Simply click on it and drag it up to the “mat.” (Choose the appropriate mat size. Lots of video tutorials out there for using CCR if you don’t “get” what the heck I’m talking about.) Drag up as many as you want and adjust the size with the little arrows on the corners of the image when you click on it. Drag them around until you like the arrangement. Make sure you use the measurements on the mat to ensure that your arrangement will fit on the mat.
 As you saw above, my arrangement was off to the side of the mat. However, I didn’t want to waste vinyl, so once I got it exactly the way I wanted to I did the click-drag thing to select the entire grouping and used the arrows in the corner to drag it over to the edge of the mat.
 Now–THIS IS IMPORTANT!–when you are using IRON-ON vinyl you need to FLIP YOUR IMAGE!!! Otherwise it will be backward, which is particularly troubling if you are doing words. Not that I have learned from experience or anything. 🙂 You have been warned.
  Now you are ready to print! Carefully place the vinyl onto the cutting mat SHINY PLASTIC SIDE DOWN! Hook your machine to your computer using a USB cord and follow the directions on CCR to cut your image. (You may want to cut down your vinyl first. I didn’t, which was a bit more complicated later on.)

 Ignore the next few pics (kindof) and read my words. I removed the vinyl prior to weeding it, which made it much harder. Don’t do that.
 Use the hook tool in your Basic Tools Kit to pick out and peel off the excess, unneeded vinyl. That is why it is called “weeding” the vinyl–you are getting rid of the things that you don’t need. Start with the small stuff and then do the big stuff. (Another thing I made an order mistake on.)
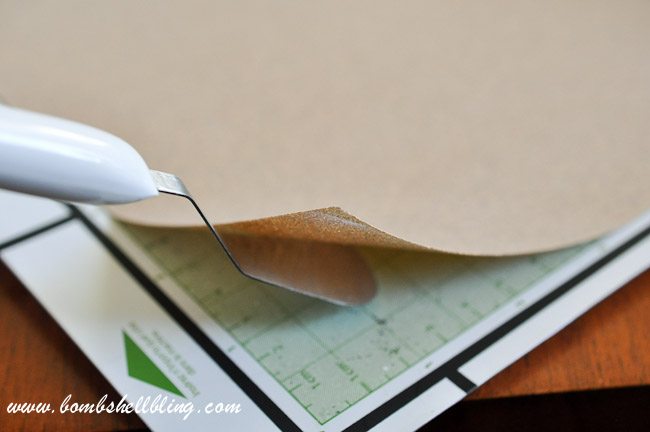
 Now that you have “weeded” your vinyl use the spatula tool to carefully peel the plastic off of the cutting mat.
 Now it’s ironing time! This seems like the scariest step, but it’s not! I always warm my iron to about a 4 (out of 6) and don’t use steam. Read the instructions on the vinyl before you decide what temperature to use. I also iron my shirt RIGHT before I lay down the vinyl just to help it stick. Just my thing. I especially do this with odd, dense fabrics like felt.
 Iron it firmly but don’t go crazy and melt the plastic or anything.
 Now just peel it up! Your balloons should stick. If there are loose pieces place them carefully and do a quick swipe over them again with your iron.
 Ta-da!! Easy peasy, right?! I’m totally using this image file to make another brightly colored balloon shirt for her birthday!
  Cutie pie.

Latest posts by Sarah Westover McKenna (see all)
- Harry Potter Birthday Party - March 22, 2019
- Christmas Caramels - December 14, 2018
- Christmas Sugar Cookies Recipe - December 12, 2018
I love these! I would love for you to link up at Link’n Blogs.
http://iputabirdonit.blogspot.com/2014/01/linkn-blogs-link-party-6.html
I love making shirts for my 1 year old baby girl with my Silhouette Cameo.
Have a great day!
xo
Daniela
Put A Bird On It
Uhhhh this is just adorable 🙂 And i LOVE the glittery viynl!!!
Thanks, Rebecca!
Love this shirt!!! So fun!!!
Did you have problems with the vinyl coming off when washing.
Not so far!